

¿Qué es la cinta correctora y cómo funciona?
La cinta correctora es una herramienta de corrección en seco que se utiliza para cubrir errores de escritura en trabajos escolares, apuntes de clase, documentos de oficina y textos cotidianos. Para entender cómo usar la cinta correctora, primero hay que saber cómo funciona.
A diferencia del líquido corrector, la cinta correctora transfiere una película correctora blanca directamente al papel, por lo que normalmente no se requiere tiempo de secado y los usuarios pueden escribir sobre ella inmediatamente.
Una cinta correctora típica consta de una película correctora, un cabezal de cinta, un carrete de alimentación, un carrete de recogida y engranajes y mecanismos de tensión internos. Durante su uso, el cabezal de cinta presiona la película correctora sobre el papel para cubrir el texto original, mientras que la película portadora usada se recoge automáticamente en el carrete interno.

Todo el proceso se puede resumir en la aplicación de la cinta, el prensado, la transferencia y la recuperación.
El poder cubriente, la adhesión, la resistencia, la tensión interna y el diseño estructural de la película correctora afectan la suavidad de la aplicación de la cinta correctora y pueden provocar roturas de la cinta, una cobertura incompleta o dificultades para escribir.
Por lo tanto, el ángulo, la presión y el método de movimiento correctos son cruciales.
Cómo usar correctamente la cinta correctora
Aprender a usar la cinta correctora es sencillo, pero la técnica adecuada influye directamente en el resultado final. Seguir los pasos que se indican a continuación puede ayudar a reducir problemas como la rotura de la cinta o una cobertura incompleta.
Paso 1: Alinee con el área incorrecta y mantenga el ángulo correcto.
Antes de utilizar la cinta correctora, identifique primero la zona que necesita corregirse y asegúrese de que la punta de la cinta correctora esté en el ángulo adecuado con respecto al papel.
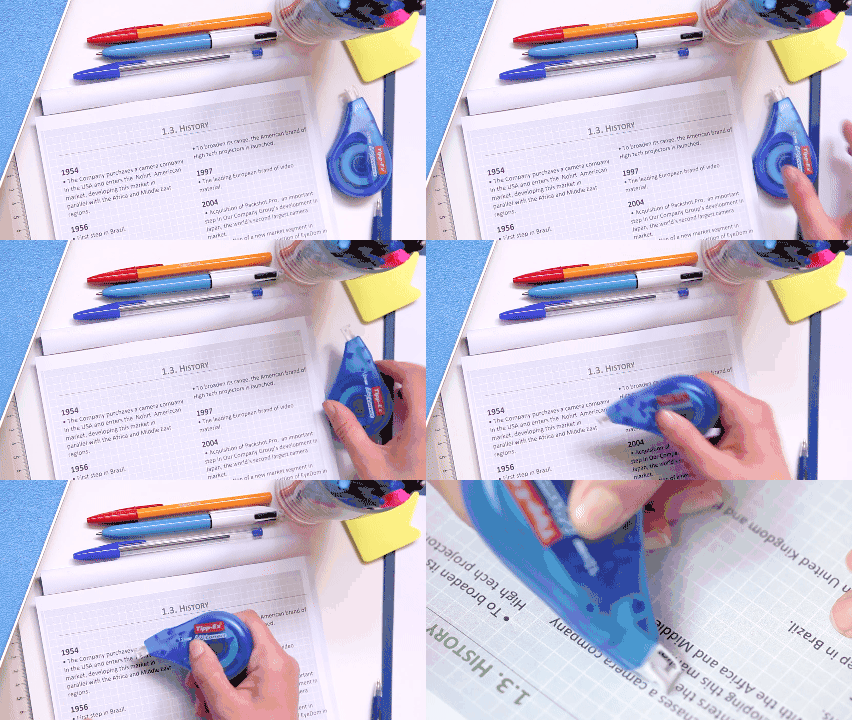
👍 Instrucciones de funcionamiento:
- Coloque el punto de salida de la cinta correctora cerca del papel.
- Alinea el texto con el texto que se va a tratar.
- Asegúrese de que el área de cobertura sea ligeramente mayor que el área de error.
⚠️ Un ángulo incorrecto puede provocar:
- La cinta correctora no se adhiere completamente al papel.
- Aparecen espacios en blanco en el área cubierta
- El texto original permanece
Mantener un agarre firme ayudará a que la cinta correctora se suelte con mayor suavidad.
La superficie y la textura del papel también pueden afectar la facilidad con la que la cinta correctora se transfiere y se adhiere.
Paso 2: Deslice suavemente la cinta correctora hasta cubrir completamente la zona.
Tras confirmar la posición, deslice la cinta correctora de manera uniforme en la dirección del texto para cubrir completamente el error.
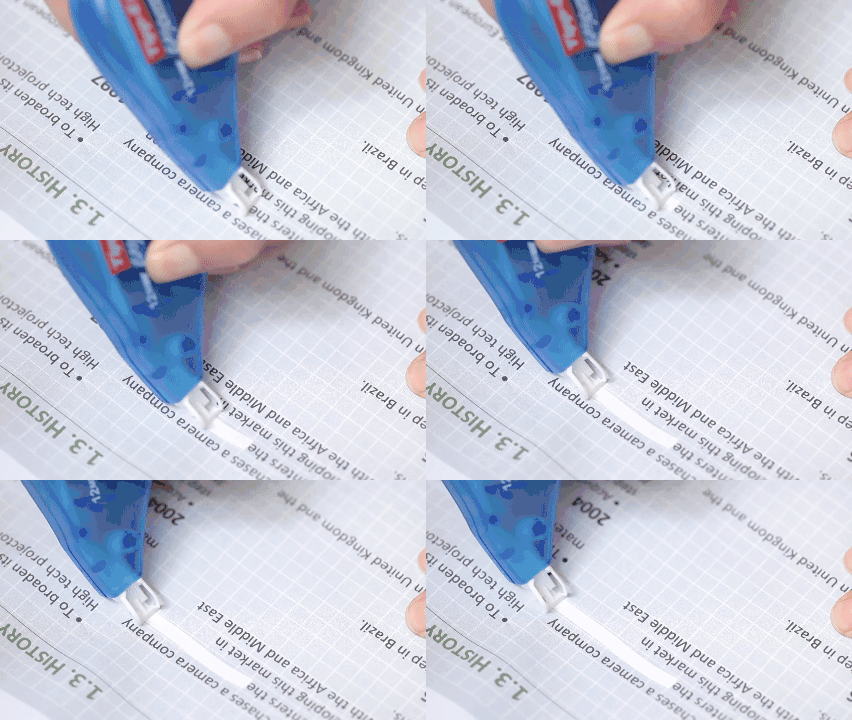
👍 Recomendaciones de funcionamiento:
- Mantenga una velocidad constante
- Utilice la fuerza adecuada; evite la presión excesiva.
- Evite detenerse a mitad de camino o realizar fricción repetida.
⚠️ Si la velocidad de empuje es demasiado rápida o la fuerza es desigual, puede provocar:
- Desgarros en la película correctora
- Capa de cobertura desigual
- Aflojamiento del núcleo dentro de la cinta correctora
Las cintas correctoras de alta calidad suelen mejorar la estabilidad durante el movimiento optimizando la tensión de la cinta y la estructura interna, lo que da como resultado un proceso de cobertura más uniforme.
Paso 3: Levante con cuidado la cinta correctora y vuelva a escribir.
Una vez finalizado el recubrimiento, no retire la cinta correctora bruscamente. En su lugar, levántela suavemente para que la película correctora se separe sin problemas del papel.
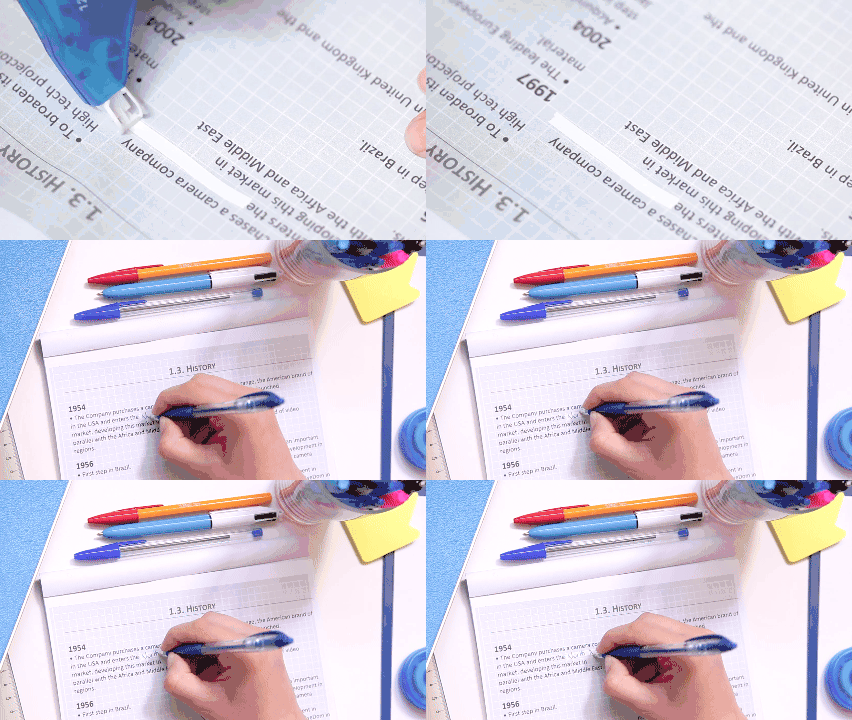
✅ Uso correcto:
- Deja de mover la cinta correctora una vez que llegues al área que necesita corrección.
- Levante suavemente la cinta correctora.
- Revisa la cobertura y reescribe.
A diferencia del líquido corrector, la cinta correctora utiliza un método de secado instantáneo, que normalmente no requiere tiempo de secado, y se puede escribir directamente sobre la zona a corregir.
⭐ Por lo tanto, es especialmente adecuado para:
- Corrección de las tareas diarias de los estudiantes
- Ajuste de documentos de oficina
- Toma de notas rápida
La clave para usar cinta correctora es mantener el ángulo correcto, aplicar una presión uniforme y moverse con firmeza. Una técnica adecuada ayuda a reducir la rotura de la cinta y la cobertura incompleta, a la vez que crea una superficie más lisa para reescribir.
Problemas comunes y soluciones para la cinta correctora
Incluso cuando los usuarios saben cómo usar correctamente la cinta correctora, pueden encontrarse con problemas comunes. Comprender las causas puede ayudarles a elegir y usar un producto más adecuado.

“El rendimiento estable de la cinta correctora depende de un control preciso del recubrimiento de la película, la tensión de la cinta, el funcionamiento de los engranajes y el ensamblaje. Pequeñas variaciones en cualquiera de estos procesos pueden afectar la experiencia final del usuario.”
—Julia Lee
Especialista en fabricación de artículos de papelería
1. ¿Por qué se rompe fácilmente la cinta correctora?
El buen funcionamiento de una cinta correctora depende no solo de su uso, sino también de la resistencia de la película correctora, la estructura del núcleo y el control de la tensión. Un diseño estructural estable puede reducir la probabilidad de rotura y atasco de la cinta.

❓ Causas comunes:
- Fuerza excesiva o velocidad de tracción
- Ángulo inadecuado entre la cinta correctora y el papel.
- Resistencia inestable o tensión interna de la película correctora.
- Estructura central defectuosa
💡 Soluciones:
- Mantenga un ángulo adecuado para que la salida de la cinta correctora quede cerca de la superficie del papel.
- Aplique una presión uniforme para moverlo suavemente.
- Evite acelerar o detenerse bruscamente, o tirar repetidamente del suelo.
- Si el núcleo de la cinta está ligeramente suelto, ajústelo adecuadamente según la estructura del producto o rebobinéelo.
2. ¿Por qué la cinta correctora no cubre bien?
Para lograr buenos resultados de corrección, es necesario considerar tanto el poder cubriente de la película correctora como las propiedades adhesivas de la capa de adhesivo. En compras al por mayor, también es importante asegurar que el efecto de cobertura sea uniforme en diferentes lotes.

❓ Causas comunes:
- El área de cobertura es menor que el texto incorrecto.
- La velocidad de movimiento es demasiado rápida o la presión es desigual.
- Hay polvo o aceite presente en la superficie del papel.
- Cobertura o adhesión insuficiente de la película correctora.
💡 Soluciones:
- Cubre un área ligeramente mayor que el texto que se va a modificar.
- Mantenga una velocidad constante y una presión uniforme.
- Asegúrese de que la superficie del papel esté limpia y seca antes de usarlo.
- Evite su uso en superficies excesivamente rugosas, húmedas o con recubrimientos especiales.
3. ¿Por qué no puedo escribir con fluidez después de hacer las correcciones?
Una cinta correctora de alta calidad no solo debe cubrir los errores, sino también proporcionar una superficie de reescritura lisa y estable. Por lo tanto, es necesario considerar de forma integral la cobertura, la suavidad de la película y el rendimiento de escritura.

❓ Causas comunes:
- La película correctora no está adherida de forma completa y uniforme al papel.
- El grosor o el tratamiento superficial de la película correctora es irregular.
- Presión inconsistente durante el uso
- Escasa compatibilidad entre la película correctora y algunos instrumentos de escritura
💡 Soluciones:
- Muévase suavemente durante la aplicación para evitar arrugar la cinta correctora.
- Después de la aplicación, asegúrese de que la superficie de corrección esté plana.
- Utilice un bolígrafo, un bolígrafo de gel o un lápiz adecuado para escribir en papel.
- Si los problemas de escritura ocurren con frecuencia, elija cinta correctora con una superficie más lisa y mejor compatibilidad con la escritura.
Para saber cómo usar la cinta correctora, no solo es necesario aplicar la técnica adecuada, sino también conocer las causas de los problemas más comunes. Mantener el ángulo correcto, una presión uniforme y un movimiento constante, junto con la elección de un producto estable y de calidad, puede ayudar a reducir la rotura de la cinta, la cobertura incompleta y los malos resultados al reescribir.
Cómo elegir cinta correctora
Para las marcas de papelería, los mayoristas, los distribuidores y los proyectos de adquisición a gran escala, la cinta correctora no solo debe cumplir con los requisitos funcionales básicos, sino que también debe estar en consonancia con el mercado objetivo, el posicionamiento de la marca y los canales de venta.
Por lo tanto, en las compras al por mayor, normalmente es posible personalizar la apariencia, las especificaciones, el embalaje y el diseño funcional.
1. Personalización exterior
La apariencia del producto es lo que los consumidores perciben con mayor claridad y constituye una forma crucial para que las marcas se diferencien. Por lo tanto, al elegir el diseño de la apariencia del producto, es fundamental considerar el público objetivo y los canales de venta.

Las opciones de personalización más comunes incluyen:
- Color de la carcasa
- Impresión de la insignia
- Patrón de diseño
- Carcasa transparente, semitransparente o de color sólido.
- Diferentes formas de producto
Los distintos mercados tienen diferentes preferencias en cuanto a estilos de apariencia.
Por ejemplo, el mercado estudiantil suele preferir colores brillantes, elementos de dibujos animados y diseños juveniles, mientras que el mercado de oficinas se adapta mejor a una apariencia limpia y profesional.
Para los clientes de marca, la coherencia en los colores, los logotipos y los elementos visuales del empaque también contribuye a un reconocimiento más claro del producto.
2. Especificaciones personalizadas
Las especificaciones de la cinta correctora influyen directamente en la experiencia del usuario, el coste del producto y su posicionamiento en el mercado. Por lo tanto, deben seleccionarse en función de los hábitos de escritura, la frecuencia de uso y el posicionamiento del producto para los usuarios objetivo, en lugar de priorizar las especificaciones más amplias o largas.

Los parámetros ajustables comunes incluyen:
- Ancho de banda, como por ejemplo 5 mm, 6 mm
- Longitud de la banda, por ejemplo 6 m, 8 m, 10 m
- Dimensiones generales del producto
- Estructura central desechable o reemplazable
Por lo general, el ancho de banda debe ajustarse a la altura del texto común, mientras que la longitud de la cinta afecta la vida útil de un producto individual.
Por ejemplo, la cinta correctora para estudiantes prioriza la portabilidad y la facilidad de transporte, mientras que los productos para oficina o de uso frecuente pueden optar por una mayor capacidad de núcleo.
3. Embalaje personalizado
El empaque no solo afecta la presentación del producto, sino también los costos de transporte, almacenamiento y venta al por menor. Por lo tanto, al elegir un tipo de empaque, se deben considerar primero los canales de venta y las necesidades reales de distribución.

Los métodos de embalaje más comunes incluyen:
- Embalaje blíster
- Embalaje de tarjetas de papel
- Embalaje de caja de color
- Envase multipack
- Cajas de exhibición para venta minorista
Los requisitos de embalaje suelen variar según el canal de venta.
Por ejemplo:
- Los supermercados y las papelerías dan prioridad a la presentación en los estantes.
- Los canales de comercio electrónico se centran más en el tamaño del embalaje, la protección del envío y las ventas agrupadas.
- Las escuelas e instituciones suelen priorizar la eficiencia del embalaje y la cantidad por caja.
4. Personalización de funciones
Además de las especificaciones básicas, la cinta correctora puede ajustarse en estructura y función para diferentes mercados.
Para saber cómo usar la cinta correctora, también es necesario tener en cuenta la opacidad de la película, la adhesión, la resistencia, la tensión y la suavidad de la escritura.
Para pedidos al por mayor, un rendimiento uniforme en todos los lotes es igualmente importante.
Los productos para estudiantes pueden centrarse en diseños ligeros y fáciles de usar, mientras que los mercados de oficina y de venta minorista de alta gama suelen valorar un rendimiento más fluido, la durabilidad y la posibilidad de reutilización.

Los diseños funcionales comunes incluyen:
- Estructura central reemplazable
- Diseño tipo bolígrafo o de pulsación lateral.
- Cubierta protectora o cabezal telescópico
- Ventana transparente para ver fácilmente el peso restante de la cinta.
- Diseño de agarre ergonómico
- Tensión interna y estructura central optimizadas
Para los compradores, la cinta correctora debe ofrecer un equilibrio entre apariencia, tamaño, funcionalidad y precio, teniendo en cuenta también los tipos de papel más comunes en el mercado objetivo, ya que las distintas superficies afectan la adherencia, la opacidad y el rendimiento de la escritura. Para más información, consulte « 20 tipos diferentes de papel y sus usos: la guía definitiva».
“La cinta correctora adecuada debe ajustarse al mercado objetivo, no simplemente utilizar el tamaño más grande o el precio más bajo. El rendimiento, las especificaciones, el embalaje y el coste deben ir de la mano.”
—Julia Lee
Especialista en fabricación de artículos de papelería
Preguntas Frecuentes
¿Cómo se utiliza correctamente la cinta correctora?
Coloca la punta de la cinta correctora cerca del papel y alinéala con el texto que deseas cubrir. Aplica una presión suave y uniforme y desliza el dispensador suavemente sobre el error. Una vez cubierta la zona, retira con cuidado la cinta correctora del papel.
¿Debes empujar o tirar de la cinta correctora?
Esto depende del diseño del dispensador, pero muchas cintas correctoras funcionan mejor cuando se deslizan suavemente sobre el papel. Lo más importante es mantener un ángulo estable, una velocidad constante y una presión uniforme.
¿Por qué se me rompe constantemente la cinta correctora?
La cinta correctora puede romperse si se presiona con demasiada fuerza, se mueve demasiado rápido, se usa un ángulo incorrecto o se detiene y tira bruscamente. La calidad de la cinta, la resistencia de la película y la tensión interna también pueden influir en la rotura.
¿Por qué mi cinta correctora no se pega al papel?
El papel puede estar polvoriento, aceitoso, húmedo, demasiado áspero o con un recubrimiento especial. Una presión desigual o un adhesivo deficiente también pueden provocar que la cinta se despegue. Para obtener mejores resultados, utilice la cinta correctora sobre papel limpio, seco y relativamente liso.
¿Cómo se arregla la cinta correctora suelta?
Si la cinta dentro del dispensador se afloja, gire suavemente el carrete o engranaje interno para tensarla. Asegúrese de que la película correctora esté plana y bien alineada antes de volver a usarla.
¿Se puede escribir sobre la cinta correctora inmediatamente?
Sí. La cinta correctora es un producto de corrección en seco, por lo que normalmente no requiere tiempo de secado. Una vez aplicada correctamente, se puede escribir sobre ella inmediatamente con bolígrafo, pluma de gel o lápiz.
Honeyoung se centra en el rendimiento, la estabilidad de la calidad y la uniformidad de los lotes de cintas correctoras, y puede ofrecer especificaciones, apariencia y empaque personalizados para satisfacer las diferentes demandas del mercado. Contáctenos para obtener más información.